Storage Node Management
- The Storage Manager introduces the concept of Storage Groups. Basically, a storage group is a group of NFS servers that share images and share the load of computers being imaged. Any member of a storage group is referred to as a Storage Node. You may have as many storage groups as you wish and as many storage nodes within those groups as you wish. In each storage group, there is one storage node which is designated as the Master of that group. Basically, this Master node is the node where all image captures go, this node handles multicasting tasks for the group, and is the image replicator the for the group. This means that whatever images are stored on this node are what gets distributed to the entire group.
- What this new system of storage management gives us is a distributed model for FOG which allows for more unicast transfers at a single time. We also gain data redundancy. We also take stress off of the main FOG server.
- Below is a brief overview of Storage Groups
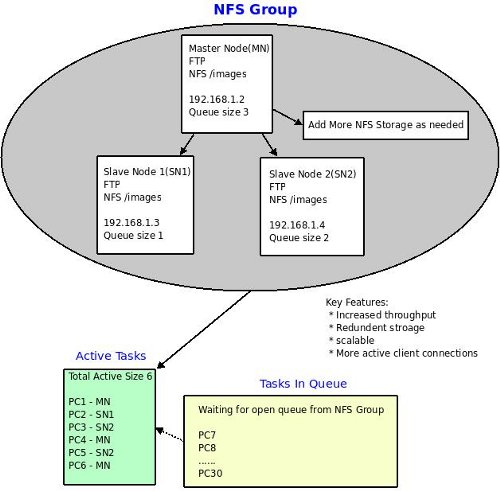
- This image shows a single Storage Group and the flow of data within the group. The queue size of the system is the sum of the queue size of all the storage nodes within the system. So if you have 4 nodes each with a queue size of 10, then the queue size of the system is 40, which means 40 clients can be imaged (unicast) at one time.
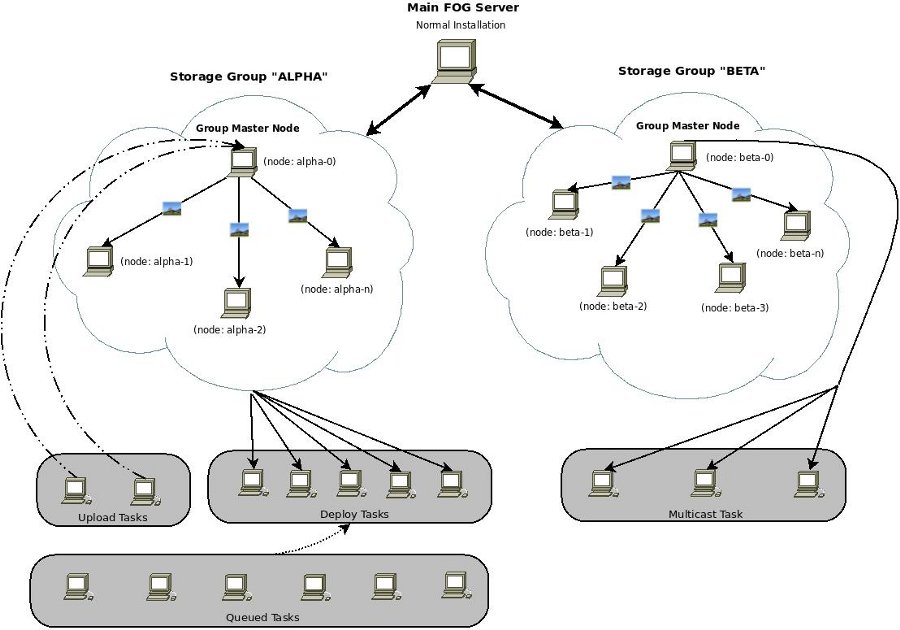
- This image shows that it is possible to have multiple storage groups on your network, which are isolated from each other. This image also demonstrates, that captures always go to the master node and multicast session always send data from the master node. Images are pushed out from the master node of the group to all other members of the group.
- Key Benefits
- Increased throughput
- Redundant Storage
- Scalability
- Also see Storage Nodes for tutorials.
Adding a Storage Node
- Definition: Storage Nodes provide extra NFS/FTP storage space which increases available throughput and redundancy within a network. They do not provide PXE, TFTP, or DHCP services at secondary sites. To enable additional PXE and TFTP services at secondary sites see this section: #Including multiple PXE / TFTP servers
- Video Tutorial: http://www.youtube.com/watch?v=X72WthDGwsw&fmt=18 (old video but still valid infomation)
- To add an additional storage node to the network, the computer should be prepared in the same way the main FOG server would be prepared (disable firewall, SELinux, etc). You can also safely mix operating systems for the nodes of you storage group, some nodes can be running fedora, and some can be running Ubuntu. It is important to update your storage nodes when you upgrade to a new version of FOG. Installation of a storage node is done with the same installer for a normal FOG server. Installation can be started by running the installer script, the steps are detailed below.
- Surprisingly enough some users have actually gotten a Windows Storage node to work properly. See Windows_Storage_Node for more information on this.
Installing the Node
- To Install a node:
- Run the installation script, ./installfog.sh
- Select your operating system.
- When prompted for Server Installation Mode, select S, for storage node.
- Enter the IP address of the storage node.
- Confirm you interface
- Then you will need to enter the IP address or host name of the node running the FOG database
- Then you will be prompted for a username (typically fogstorage)
- and a password that is located on the FOG server, that will allow the storage node to access the main FOG server's database. This information is located in the FOG management portal for convenience (on the main for server). It can be accessed via Other Information -> FOG settings -> section FOG Storage Nodes.
- You will then be prompted to confirm your installation settings, if they are correct press Y end hit Enter.
- When installation completes, the install will produce a username and password that will be needed to add the storage node to the FOG management portal. Username is "fog", password is in /opt/fog/.fogsettings (see also install-fogsettings )
Adding the Node to the Management Portal
- To Add a Node
- Log into the FOG Management Portal
- Navigate to the Storage Management section.
- Click on Add Storage Nodes.
- For the Storage Node Name, enter any alpha numeric string to represent the storage node.
- Enter any description you wish
- Enter the IP address of the storage node you are adding. This must be the IP address of the node, DO NOT use a hostname here or the node will not function correctly.
- Enter the maximum number of unicast clients you would like this node to handle at one time. The value that we recommend is 10.
- Is Master Node is a very dangerous settings, but for right now leave it unchecked, for more details please see: storage-node#Master Node Status
- Next, select the storage group you would like this member to be a part of, in our example we will pick Default
- Next, specify the image location on the storage node, typically /images/, your image location should always end with a /.
- Next, you will want to check the box, to enable the node.
- The last two fields take the username and password that are generated during the installation of the storage node. username is "fog", password is in /opt/fog/.fogsettings
- Then click Add to have the node join the storage group. #### Monitoring The Master Node
- On all storage nodes there is a new service (as of version 0.24) called FOGImageReplicator which is a very basic script which, if the node is the master, copies all of its images to all other nodes in the storage group. The coping is done every ten minutes by default, which means your images are NOT instantly duplicated to all nodes.
- If you would like to view the status of the image replication, you can do so on the storage node by switching to tty3, by typing ctl + alt + f3. Output is also logged to a file in the /opt/fog/log directory.
- FOGImageReplicator logs are also located in
 Fog Configuration -> Log Viewer -> FILE: [Select Image Replicator]
Master Node Status
- The Master Node (could be the server or a particular node) in a storage group is the node that distributes images files to all other nodes in the storage group.
- If you have all your images distributed across 3 nodes in a storage group, if you add a new storage node that has no images stored on it, making that node master will cause it to take over and push it's image store of nothing to all other nodes, wiping out all of your images. So it is important to be very careful and backup your images when you change a node's master status.
Note
You can have many storage nodes in a storage group. You can have one master storage node in a storage group. You can not have more than one master storage node in a storage group. You must have one master storage node for replication to take place to other nodes in the group. If a master storage node is set, all captures first go to the master storage node of the storage group the image is assigned to; and are then replicated to other storage nodes.
Note
Master node status also decides which node transmits a multicast session, so a site whose node is not a master cannot serve multicast locally even with the image replicated to it. If you multicast to more than one site, see Multicast across multiple sites.
Including multiple PXE / TFTP servers
- A traditional Master Storage Node, as described above only provides File Storage redundancy. While this can help increase multicast throughput on a single network, all the machines under FOG management must be within the same subnet/VLAN so that DHCP broadcast requests can be directed to the Main server. (see note below)
Note
depending on the network, it may be possible to configure [http://en.wikipedia.org/wiki/UDP_Helper_Address iphelper] to forward packets to the Main FOG server
-
The following instructions are intended to help configure additional Storage Nodes to operate independently on separate networks, while still syncing with and taking commands from a single Main FOG server.
-
Click here for instructions on setting up multiple PXE / TFTP servers