
Install FOG server
FOG 1.6
This page describes FOG 1.6. If you specifically want FOG 1.5.x, see the 1.5 version of this page — branch choice, the installer prompts, and the update process all differ.
Before rushing into installing FOG you want to make sure you check the requirements
The installation instructions here assume that you have a freshly installed server available that only contains the minimal set of packages.
Updating fog is essentially the same process, just instead of creating a fresh clone of the repo, you do a git pull and run the installer again — or let bin/updatefog.sh do both steps for you.
The quick way
If you just want FOG on a fresh server and do not need to inspect anything
first, one command does the whole of this page’s Prerequisite and Run the
installer sections. It installs git, clones the repository, checks out the
branch for the channel you asked for, and starts the installer:
curl -fsSL https://raw.githubusercontent.com/FOGProject/fogproject/working-1.6/bin/bootstrap.sh | sudo bash -s -- --channel beta
The installer then runs interactively, exactly as it does when you start it by hand, so you still answer every prompt yourself.
Tip
Put
sudowhere it is above — beforebash, not beforecurl.sudoasks for your password on the terminal rather than on standard input, so the pipe is unaffected.If you leave it out, the script notices it is not root and re-runs itself under
sudo— but from a pipe it has no file to handsudo, so it has to download itself a second time to do it. Includingsudoyourself avoids that.
Warning
That runs a script from the internet as root, and the URL points at a branch, so its content changes whenever we push. If you would rather read it first — and on a server you care about, you should — do it in two steps:
curl -fsSL -o bootstrap.sh https://raw.githubusercontent.com/FOGProject/fogproject/working-1.6/bin/bootstrap.sh
less bootstrap.sh
sudo bash bootstrap.sh --channel beta
Options:
--channel stable|patches|beta|rc   which line to install (default stable)
--branch <name>                    a literal branch or tag instead of a channel
--git-path /path                   where to clone (default /root/fogproject)
-y, --yes                          run the installer unattended
--yes is for Ansible, cloud-init and similar. Without it, and with no
terminal available to answer prompts on, the script stops and tells you to pass
--yes — rather than quietly starting an unattended install of imaging
software on a machine nobody is watching.
Which copy of bootstrap.sh you fetched has nothing to do with what it
installs. The URL above is simply where the file lives; --channel decides the
rest.
If the path already contains a git checkout, the script leaves it completely
alone and points you at bin/updatefog.sh. It will not clone over, reset, or
pull a working tree that is already there.
If FOG is already installed on the machine, this is safe to run. The script
reads /etc/fog/fog.conf to find the existing server:
- If that install has a git checkout recorded, the script hands over to that
checkout’s
bin/updatefog.sh, passing your--channeland--yesthrough. Nothing is cloned, and the checkout your server was installed from is the one that gets updated. - If it has no checkout — a tarball install — the script clones one and says plainly that it is upgrading the running server in place. Your database and settings are kept.
Note
The clone is large. The repository holds roughly 200,000 objects, so expect several minutes on a first install, and longer on a slow connection. The receive phase can look like nothing is happening.
Everything below is the same thing done by hand, which is still the right choice if you want to see each step.
Prerequisite
The preferred method of getting FOG is via Git.
Debian based
sudo -i
apt-get -y install git
RedHat based
sudo -i
dnf -y install git
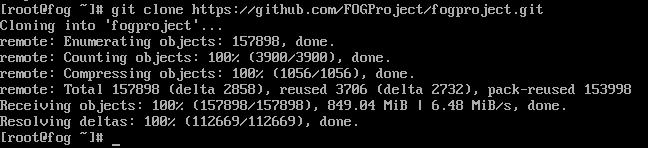
Now that git is installed, you should be able to clone the FOG repository. Generally we recommend to put the repository inside of /root but if you’ve done this sort of thing before, put it wherever you want. Here’s how you clone the FOG repository/code to your local machine:
sudo -i
cd /root
git clone https://github.com/FOGProject/fogproject.git
cd fogproject
Choosing a FOG version
A plain clone gets you the stable branch — the default branch, and FOG’s
longer-term-tested line. FOG 1.6 lives in working-1.6 — this is the
branch to check out if you’re following this page: a bigger jump than a
point release, with a restructured PKI layout, Secure Boot support by
default, and more.
Note
See 1.6 changes for pages related to config changes that may be required in some instances when moving to 1.6. We are striving to catch everything in the installer universally, but as we find gotchas, even if they get fixed, we’re trying to notate those for all.
Warning
Be aware that you should not consider switching back to the stable branch without thorough consideration. This is due to the database schema changes that are introduced over time. Once a server’s database has the 1.6 schema applied, it cannot go back to
stable— you may need to wait until the next official 1.6.x release to revert. Doing otherwise is at your own risk! (Though to be fair, these types of issues have been rare, this is just a disclaimer, there’s also a database change that can be made to force a revert of the schema, though there’s still some potential risk, we haven’t seen such issues, but there’s still risk)
Just want FOG 1.5.x?
dev-branchis FOG’s actively-patched 1.5.x line, separate fromstableand fromworking-1.6— for exampledev-branchmay already be on 1.5.10.53 whilestableis still on an older 1.5.x point release. See the 1.5 version of this page for the branch choice, installer prompts, and update process specific to that line.
To install 1.6, git checkout the working-1.6 branch like so (just ignore
the comment lines starting with ’#’):
#cd into where you cloned the git repo, e.g. /root/fogproject
cd /root/fogproject
#update all branches
git fetch --all
#switch to the 1.6 branch
git checkout working-1.6
#if updating run make sure to pull the latest changes
git pull
Then you can run the installer to perform an upgrade or new install as shown in the next section.
You can switch back to the stable branch with:
cd /root/fogproject
git fetch --all
git checkout stable
You can see a list of current branches here: https://github.com/FOGProject/fogproject/branches
Tip
If you have issues with
git pullsaying you have pending changes, usegit reset --hard origin/{branchName}to undo file changes within your repo folder that sometimes occur during the install then rungit pullagain to ensure your on the latest.
Updating an existing install
The manual git fetch/git checkout/git pull steps above still work exactly
as described, and give you the most control — useful if you want to inspect
changes before pulling them, update to a specific commit or tag, or otherwise
customize the process.
If you’d rather not do that by hand every time, bin/updatefog.sh does the one
thing the installer cannot do for itself — move the working copy to another
commit — and then runs the installer:
cd /root/fogproject/bin
./updatefog.sh
It fetches and checks out the branch mapped from the update channel this server
tracks, then runs installfog.sh interactively. Pass -y for unattended.
Options:
./updatefog.sh --help
Usage: ./updatefog.sh [-h?y] [--channel stable|patches|beta|rc] [--branch <name>] [--git-path </path>]
    -h -? --help       Display this info
          --channel    Update channel to track: stable, patches, beta or rc
                        defaults to whatever this server already tracks
          --branch     Check out an arbitrary branch instead of a channel,
                        e.g. to test a PR. One-off: does not change the
                        tracked channel for future runs
          --git-path   Override the git checkout path this server records
    -y    --yes        Skip the confirmation prompt AND run the installer
                        unattended (-Y). Pass it from cron and the GUI
The channels map to branches like this:
| Channel | Branch | What it is |
|---|---|---|
stable | stable | the last release |
patches | dev-branch | the 1.5.x patches line |
beta | working-1.6 | the 1.6 development line |
rc | the newest rc-* | the current release candidate, if one is published |
staging and dev still work as names, and always will, because servers
installed before the names changed have one of them recorded. Be careful with
dev: it means beta, not dev-branch. Use patches if you want
dev-branch.
rc is the only channel that can resolve to nothing — between releases there
is no release candidate published, and the script says so rather than failing
in some less obvious way.
Note
Nothing is reverted for you any more, and nothing needs to be.
updatefog.shused to back up the files the installer overwrites, and git-revert the checkout if an update failed. Both are gone, for good reasons.The backups moved into
installfog.sh, so they now protect a plain./installfog.shupgrade too — which is how most people upgrade, and which the wrapper could never have covered. What is preserved, what is deliberately not, and where to put things so they survive is documented in Supported customizations.The automatic revert became an offer. When an install fails and the checkout has moved since the last one that succeeded, the installer prints the exact command to go back:
git -C /root/fogproject reset --hard <commit>
cd /root/fogproject/bin && ./installfog.sh
It does not run it. Reverting means running the installer a second time on a server that has just failed running it once, which is the least predictable moment to do the most invasive thing — so the decision is yours. The part you could not easily work out for yourself, which commit last installed cleanly, is the part it tells you.
The channel you choose is remembered for next time, the same way .fogsettings
already remembers your other install choices — see
The .fogsettings file. It’s also mirrored into the
database as FOG_GIT_PATH/FOG_UPDATE_CHANNEL under the FOG Update
category on the Settings page in the web UI, so you can see which checkout and
channel a server is tracking without SSHing in. That copy is informational
only — editing it there has no effect on the next update; change the channel
with --channel instead.
Alternatives
If you have issues or good reasons for not using Git, you can just download the FOG installer bundle as ZIP or tar.gz archive.
Simply extract the archive and start the installer as described below.
Run the installer
To start the installation process, follow the steps below. Running the installer must be done as root.
  sudo -i
  cd /root/fogproject/bin
  ./installfog.sh
Tip
The installer also has various switches for running silently and more, see Fog installer command line options
Before all the components are installed, you are asked several questions to make sure the setup suits your situation and is ready to use right after the installer finishes:
Installer Prompts
| Prompt | Description |
|---|---|
| SELinux | this only applies to RedHat based installs FOG supports SELinux enforcing, and leaving it on is now the default. The installer labels its own directories, ships a small policy module for the ports the web tier needs, and has been tested capturing, deploying and replicating under enforcing. You are still asked, and can still choose permissive, but you no longer need to. Older versions of FOG recommended permissive and switched to it automatically under -y; that is no longer the case. |
| Local Firewall | The installer now configures your firewall rather than asking you to switch it off. It opens only the ports your install actually uses, on firewalld and ufw, and prints the exact commands for raw iptables (which it deliberately does not modify — see below). You can still choose to disable the firewall, or to leave it alone and configure it yourself. Note older versions did nothing at all here under -y, leaving the firewall in whatever state the machine happened to be in. For the port list, the manual steps for all three backends, and how to restrict FOG to one subnet, see Firewall configuration for a FOG server. |
| OS Selection | The installer tries to guess the distribution you’re running. Just confirm the selection if it’s correct, otherwise choose the apropriate option. |
| Installation mode | With the same installer you can install a normal FOG server (called master node) or a FOG storage node. A storage node uses this same installer — you would answer Y here to install one instead of a full server. For what a storage node is and how to manage one, see Storage Node Management. As we’re installing a full FOG server here, choose N here. |
| Default Network interface | The installer needs to know which network interface will be used for hosting PXE booting as well as sending images via unicast and multicast. If the installer guessed the right interface, then choose n(o) to proceed, using the pre-selected network interface. Otherwise, choose y(es) and type in the name of the network interface (like eth0, ens192). |
| DHCP Service | You have the option to run a DHCP service on the FOG server itself or, if you already have a DHCP server in your network, then you can answer n(o) to the following three questions. For more information on configuring an existing DHCP server to work with FOG, see DHCP Server Settings. The questions on DHCP are in reverse order; the settings first, and finally if you really want to enable DHCP on your FOG server. This order might be changed in future versions of the installer. |
| DHCP Router address | If you’re going to run a DHCP server on this FOG server, then type y(es) and type in the router (or default gateway) address that the DHCP server will advertise. If you have an existing DHCP server on your network, choose N here. (This question is irrelevant if you choose to use or set up your own DHCP server and will be hidden in future versions when DHCP is de-selected.) |
| DHCP handle DNS | If you’re going to run a DHCP server on this FOG server, then type y(es) to advertise DNS server IPs to the clients and type in the IP address of the local DNS server. If you have an existing DHCP server on your network, choose n(o) here. (This question is also irrelevant if you choose to use or set up your own DHCP server and will be hidden in future versions when DHCP is de-selected.) |
| Activate DHCP | If you want to run a DHCP server on this FOG server, then choose y(es). Otherwise choose n(o). |
| Internationalization support | If you want the FOG web UI to provide additional languages, choose y(es) here. |
| HTTPS Support | You can choose to set up FOG with encrypted communication. With FOG providing several different services (e.g. web UI for configuration, web API, PXE booting, client management using the kb/reference/network-and-firewall-requirements > FOG Client to FOG Server communications ) choosing HTTPS support has consequences: 1. A self-signed certificate is being generated for you. 2. The Apache webserver is also set up to host the web UI through HTTPS. 3. iPXE on-the-fly compilation happens to include that certificate into the PXE binaries provided by your new FOG server Usually this works out of the box and doesn’t take manual intervention. But if you are unsure, you might still choose n(o) to reduce the risk of issues. Even without HTTPS support, the communication between fog-client and the FOG server uses a secured encrypted channel. On 1.6 this can be combined with the signed Secure Boot chain; on 1.5 it can’t — see the 1.5 version of this row. |
| Hostname | This host name is used in the FOG web UI. Review the auto-detected hostname; choose n(o) to accept the suggested hostname, or y(es) to enter the correct hostname. |
| Summary | The installer prints out all options as chosen. If you are sure everything is correct, choose y(es) to proceed installing. Choosing n(o) will terminate the installer, and you will need to restart the process, answering all the questions again. |
Installation questions
If the installer detects a mysql database server with an empty ‘root’ password, you are required to enter one to be set. In case the Linux account ‘fogproject’ has been used on this server, the installer will complain and provide information and instructions on how to mitigate the situation.
Database setup
While most of the installation runs without intervention, there is one step you need to do manually. The installer will prepare the database for you and then ask you to open your web browser and visit the FOG web UI to build the initial database schema or promote an existing database with new schema updates. Make sure you follow this step and only proceed with the installer (hit ENTER) after the schema update/setup has finished, or the installer will fail.
Final steps
If everything worked as expected, the installer end will with the following information:
* Setup complete

 You can now login to the FOG Management Portal using
 the information listed below.  The login information
 is only if this is the first install.

 This can be done by opening a web browser and going to:

 https://x.x.x.x/fog/management

 Default User Information
 Username: fog
 Password: password
Now your FOG Server is ready to use! Go ahead, login to the web UI and start using FOG and have fun. A good first step is to capture an image from a model machine, then deploy it to your other computers.
Fog installation settings
All your choices during the installation are saved in the file
/opt/fog/.fogsettings.
The next time you start the installer, it will skip all questions (except for a prompt to check for schema updates in the web ui, unless you specify -Y) and continue at the ‘Summary’ step.
In this way you can easily re-install or update a Fog server.
For an overview of all settings in the .fogsettings file, see The .fogsettings file
Install errors
If the installer fails or something doesn’t look right, the full output of the
run is captured in error_logs/foginstall.log, and more detailed errors are
written to error_logs/fog_error_<version>.log. Both live in the directory you
ran the installer from (the bin/ directory of the cloned repo).
When asking for help on the FOG forums, include the relevant portion of those logs — it’s the fastest way to get a useful answer.